DAQ Server Guide
This a server that provides remote access to a National Instruments DAQ (data acquisition device) for power measurement. National Instruments provide DAQ drivers only for Windows and for very specific (old) Linux kernels. This package allows DAQs to be usable from other operating systems.
The idea is that the DAQ is connected to a machine running an OS for which drivers are available; that machine is also running the server component of this package. A program or a script running on a different OS can then use the client part of this package to configure and collect measurements from that DAQ.
Contents
DAQ Device Wiring
The server expects the device to be wired in a specific way in order to be able to collect power measurements. Two consecutive Analogue Input (AI) channels on the DAQ are used to form a logical “port” (starting with AI/0 and AI/1 for port 0). Of these, the lower/even channel (e.g. AI/0) is used to measure the voltage on the rail we’re interested in; the higher/odd channel (e.g. AI/1) is used to measure the voltage drop across a known very small resistor on the same rail, which is then used to calculate current. The logical wiring diagram looks like this:
Port N
======
|
|   AI/(N*2)+   <--- Vr -------------------------|
|                                                |
|   AI/(N*2)-   <--- GND -------------------//   |
|                                                |
|   AI/(N*2+1)+ <--- V  ------------|-------V    |
|                           r       |            |
|   AI/(N*2+1)- <--- Vr --/\/\/\----|            |
|                 |                              |
|                 |                              |
|                 |------------------------------|
======

Where:
        V: Voltage going into the resistor
        Vr: Voltage between resistor and the SOC
        GND: Ground
        r: The resistor across the rail with a known
           small value.
The physical wiring will depend on the specific DAQ device, as channel layout varies between models.
Note
Current solution supports variable number of ports, however it assumes that the ports are sequential and start at zero. E.g. if you want to measure power on three rails, you will need to wire ports 0-2 (AI/0 to AI/5 channels on the DAQ) to do it. It is not currently possible to use any other configuration (e.g. ports 1, 2 and 5).
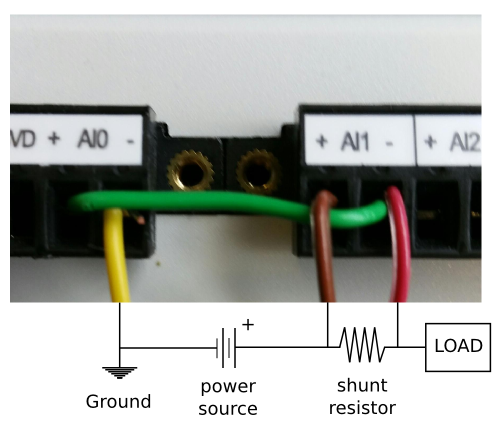
As an example, the following illustration shows the wiring of PORT0 (using AI/0 and AI/1 channels) on a DAQ USB-6210
Setting up NI-DAQmx driver on a Windows Machine
The NI-DAQmx driver is pretty big in size, 1.5 GB. The driver name is ‘NI-DAQmx’ and its version ‘9.7.0f0’ which you can obtain it from National Instruments website by downloading NI Measurement & Automation Explorer (Ni MAX) from: https://www.ni.com/en-gb/support/downloads/drivers/download.ni-daqmx.html#288366
Note
During the installation process, you might be prompted to install .NET framework 4.
The installation process is quite long, 7-15 minutes.
Once installed, open NI MAX, which should be in your desktop, if not type its name in the start->search.
Connect the NI-DAQ device to your machine. You should see it appear under ‘Devices and Interfaces’. If not, press ‘F5’ to refresh the list.
Complete the device wiring as described in the DAQ Device Wiring section.
Quit NI MAX.
Setting up DAQ server
The DAQ power measurement solution is implemented in daqpower Python library, the package which is available for download via pip or from Github.
Install NI-DAQmx driver, as described in the previous section.
Install Python 2.7 or Python3.
Download and install
pipandnumpyPython packages. These packages have C extensions, so you will need a native compiler set up if you want to install them from PyPI. As an easier alternative, you can find pre-built Windows installers for these packages here (the versions are likely to be older than what’s on PyPI though).Install the daqpower package using pip:
sudo -H pip install daqpowerOr alternatively install the latest development version from GitHub:
git clone git@github.com:ARM-software/daq-server.git daq-server
cd daq-server
sudo -H python setup.py install
This should automatically download and install
PyDAQmxpackage as well (the Python bindings for the NI-DAQmx driver).
Running DAQ server
Once you have installed the daqpower package and the required dependencies as
described above, you can start the server by executing run-daq-server from the
command line. The server will start listening on the default port, 45677.
Note
There is a chance that pip will not add run-daq-server into your
path. In that case, you can run daq server as such:
python C:\path to python\Scripts\run-daq-server
You can optionally specify flags to control the behaviour or the server:
usage: run-daq-server [-h] [-d DIR] [-p PORT] [-c DAYS]
                      [--cleanup-period DAYS] [--debug] [--verbose]

optional arguments:
  -h, --help            show this help message and exit
  -d DIR, --directory DIR
                        Working directory
  -p PORT, --port PORT  port the server will listen on.
  -c DAYS, --cleanup-after DAYS
                        Sever will perodically clean up data files that are
                        older than the number of days specfied by this
                        parameter.
  --cleanup-period DAYS
                        Specifies how ofte the server will attempt to clean up
                        old files.
  --debug               Run in debug mode (no DAQ connected).
  --verbose             Produce verobose output.
Note
The server will use a working directory (by default, the directory the run-daq-server command was executed in, or the location specified with -d flag) to store power traces before they are collected by the client. This directory must be read/write-able by the user running the server.
Collecting Power with Workload Automation
The DAQ is a supported instrument in Workload Automation which can uses the DAQ to collect power measurements during workload execution.
Note
You do not need to install the daqpower package on the machine
running WA, as it is already included in the WA install structure.
You can enable daq instrument your agenda/config.yaml in order to get WA to
collect power measurements. At minimum, you will also need to specify the
resistor values for each port in your configuration, e.g.:
resistor_values = [0.005, 0.005] # in Ohms
This also specifies the number of logical ports (measurement sites) you want to use, and, implicitly, the port numbers (ports 0 to N-1 will be used).
Note
“ports” here refers to the logical ports wired on the DAQ (see DAQ Device Wiring, not to be confused with the TCP port the server is listening on.
Unless you’re running the DAQ server and WA on the same machine (unlikely considering that WA is officially supported only on Linux and recent NI-DAQmx drivers are only available on Windows), you will also need to specify the IP address of the server:
daq_server = 127.0.0.1
There are a number of other settings that can optionally be specified in the configuration (e.g. the labels to be used for DAQ ports). Please refer to the WA DAQ Documentation for more details.
Collecting Power from the Command Line
daqpower package also comes with a client that may be used from the command
line. Unlike when collecting power with WA, you will need to install the
daqpower package. Once installed, you will be able to interact with a
running DAQ server by invoking send-daq-command. The invocation syntax is
usage: send-daq-command [-h] [--device-id DEVICE_ID] [--v-range V_RANGE]
                [--dv-range DV_RANGE] [--sampling-rate SAMPLING_RATE]
                [--resistor-values [RESISTOR_VALUES [RESISTOR_VALUES ...]]]
                [--labels [LABELS [LABELS ...]]] [--host HOST]
                [--port PORT] [-o DIR] [--verbose]
                command [arguments [arguments ...]]
Options are command-specific. COMMAND may be one of the following (and they should generally be invoked in that order):
- configure
Set up a new session, specifying the configuration values to be used. If there is already a configured session, it will be terminated. OPTIONS for this this command are the DAQ configuration parameters listed in the DAQ instrument documentation with all
_replaced by-and prefixed with--, e.g.--resistor-values.- start
Start collecting power measurements.
- stop
Stop collecting power measurements.
- get_data
Pull files containing power measurements from the server. There is one option for this command:
--output-directorywhich specifies where the files will be pulled to; if this is not specified, the will be in the current directory.- close
Close the currently configured server session. This will get rid of the data files and configuration on the server, so it would no longer be possible to use “start” or “get_data” commands before a new session is configured.
A typical command line session would go like this:
send-daq-command --host 127.0.0.1 configure --resistor-values 0.005 0.005
# set up and kick off the use case you want to measure
send-daq-command --host 127.0.0.1 start
# wait for the use case to complete
send-daq-command --host 127.0.0.1 stop
send-daq-command --host 127.0.0.1 get_data
# files called PORT_0.csv and PORT_1.csv will appear in the current directory
# containing measurements collected during use case execution
send-daq-command --host 127.0.0.1 close
# the session is terminated and the csv files on the server have been
# deleted. A new session may now be configured.
In addition to these “standard workflow” commands, the following commands are also available:
- list_devices
Returns a list of DAQ devices detected by the NI-DAQmx driver. In case multiple devices are connected to the server host, you can specify the device you want to use with
--device-idoption when configuring a session.- list_ports
Returns a list of ports that have been configured for the current session, e.g.
['PORT_0', 'PORT_1'].- list_port_files
Returns a list of data files that have been generated (unless something went wrong, there should be one for each port).
Collecting Power from another Python Script
You can invoke the above commands from a Python script using
daqpower.client.DaqClient() function, passing in
daqpower.config.DeviceConfigruation to the configure()
function.. Please see the implementation of the daq WA instrument
for examples of how these APIs can be used.